How to Get Nvidia Installer When Cannot Continue
NVIDIA Installer Cannot Continue? 4 Easy Ways to Fix It
Keeping your drivers up to date is key. Use automation to do it effortlessly.
by Vladimir Popescu
Vlad Turiceanu
![]()
Passionate about technology, Windows, and everything that has a power button, he spent most of his time developing new skills and learning more about the tech world. Coming... read more
- The NVIDIA installer cannot continue error is usually caused by an outdated graphics card driver.
- Begin by updating it from Device Manager and making sure it is enabled.
- Alternatively, restart the NVIDIA processes inside the Services app.
XINSTALL BY CLICKING THE DOWNLOAD FILE
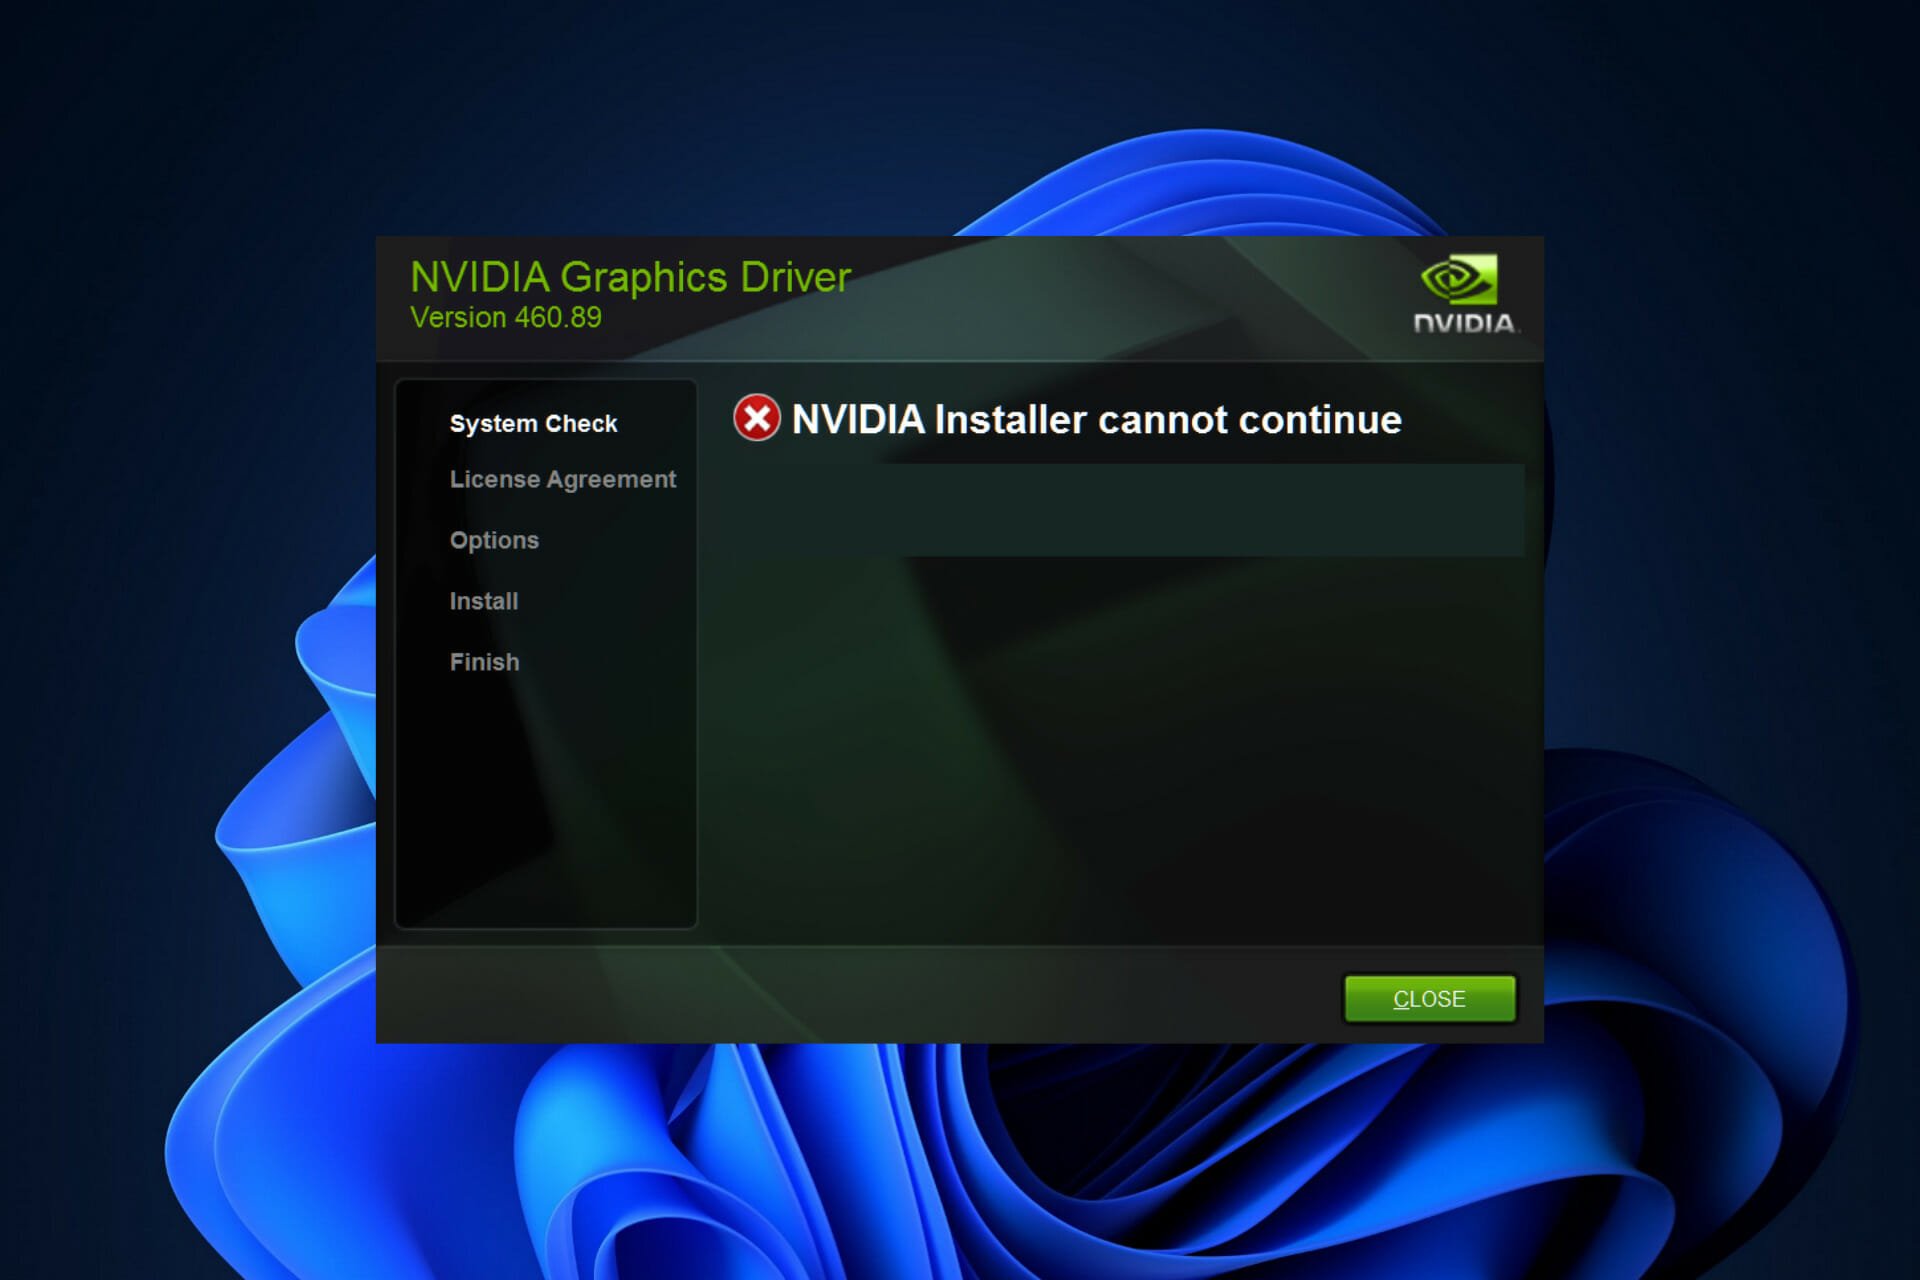
The NVIDIA installer cannot continue is an error message that will prevent you from installing drivers for your graphics card.
You will almost certainly receive the same message over and over again no matter how many times you attempt to install them on your computer.
In addition, this error occurs with a wide range of drivers and Windows iterations, indicating that there are numerous potential causes.
That is to say, it does not exclude anyone, and for many users, resolving the issues can be a frustrating experience.
Fortunately, there is a good chance that one, if not more, of the methods below, will be effective for you, so continue reading to find out which one is the most effective.
Even if the installation of the drivers failed, an NVIDIA folder will be created in the partition where your operating system is installed after you have downloaded and installed the drivers.
This is due to the fact that it extracts its setup before beginning the installation process.
This folder will be required even if the setup fails, so if it has been deleted after the setup has failed, re-enter the setup to have it created. But now let's see shortly what Game Ready Drivers do and then jump into the list of solutions.
What do Game Ready drivers do?
The most frequently encountered drivers are those for NVIDIA's GeForce Game Ready Technology.
They are able to provide users with better gaming experiences because they make use of the most up-to-date display technologies.

In general, when a new major game is released, Game-Ready drivers are released to improve game performance, fix game bugs, and enhance a user's gaming experience for those who are playing the game.
If the new games simply get better support, we wouldn't classify it as a driver update, but rather as an improvement.
In case the update simply states that it adds support for certain games that you do not play, then you do not require it. However, if the update is a large one that fixes bugs and other issues, then you do need it.
Regular Game-Ready drivers and Studio drivers are the same things, with the exception that the Studio drivers have been optimized and tested with specific applications.
What can I do if the NVIDIA installer cannot continue?
This being said, let's jump into the list of solutions and keep in mind that they also work for the NVIDIA installer cannot continue in Windows 10 error.
1. Update your graphics card drivers to fix NVIDIA installer cannot continue
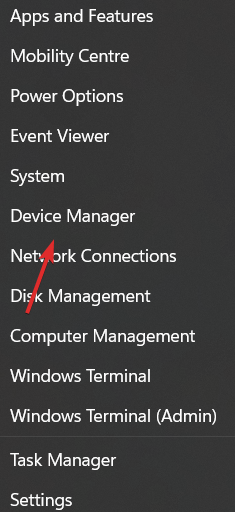
- Right-click on the Start icon from your Taskbar and select Device Manager.
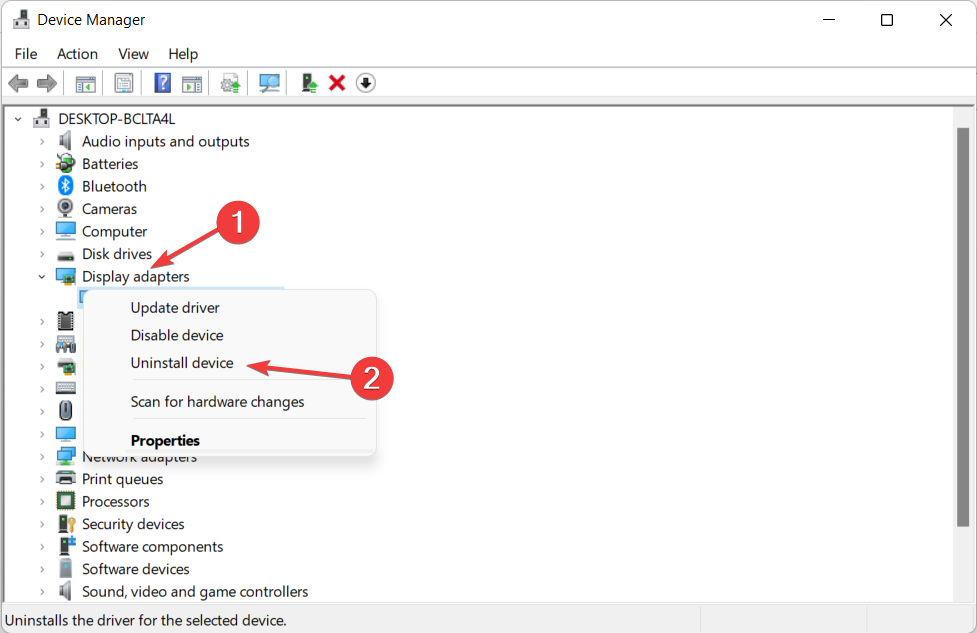
- Next, expand the Display adapters folder and right-click on the NVIDIA driver to select Uninstall device.
Some PC issues are hard to tackle, especially when it comes to corrupted repositories or missing Windows files. If you are having troubles fixing an error, your system may be partially broken.
We recommend installing Restoro, a tool that will scan your machine and identify what the fault is.
Click here to download and start repairing.
Note that if the full error message states as NVIDIA installer cannot continue, not compatible with this version of Windows, you will have to update your operating system as well.
Check out the article linked for a thorough guide on how to do it.
We must also note that the Device Manager may not always be able to accurately detect new driver versions. If you want a more precise utility, we recommend you install something like DriverFix.
It scans your system and automatically installs new driver versions whenever necessary. It's easy to use and you can set it up to run in the background and ensure all your drivers are in check.
⇒ Get DriverFix
2. Enable your NVIDIA driver to fix NVIDIA installer cannot continue
- Begin by right-clicking on the Start icon from your Taskbar and choosing Device Manager.
- Tap on the Display adapters option, then right-click on the NVIDIA driver. Make sure you select the Enable device option. If it is selected, you will be shown the option to Deselect it.

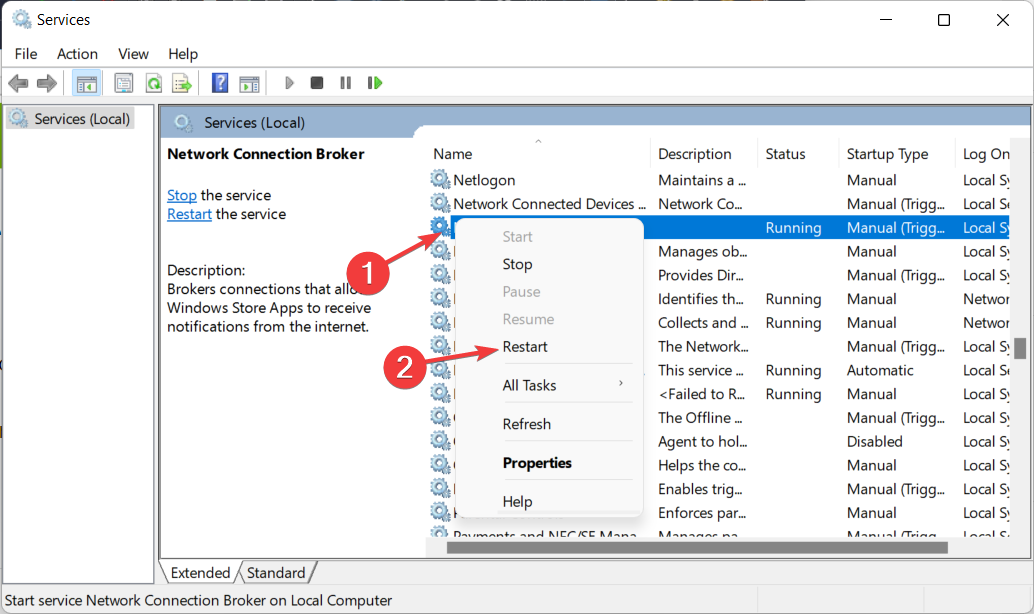
3. Restart the NVIDIA services to fix NVIDIA installer cannot continue
If you get the NVIDIA installer cannot continue error, then you should restart all the NVIDIA services. There might be an issue with one of them, which causes the installation to fail.
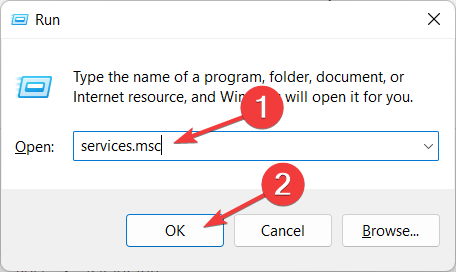
1. Press the Windows + R buttons to open the Run dialog.
2. Type services.msc and then press Enter or click OK.
3. Scroll down until you meet the services that start with NVIDIA.
4. Right-click on each of them to select the Restart option.
5. Reboot your PC if the full error message states that the NVIDIA installer cannot continue, a system restart is required.
4. Stop the NVIDIA processes to fix the NVIDIA installer cannot continue
- Press CTRL + SHIFT + ESC in order to open the Task Manager app and navigate to the Details page.
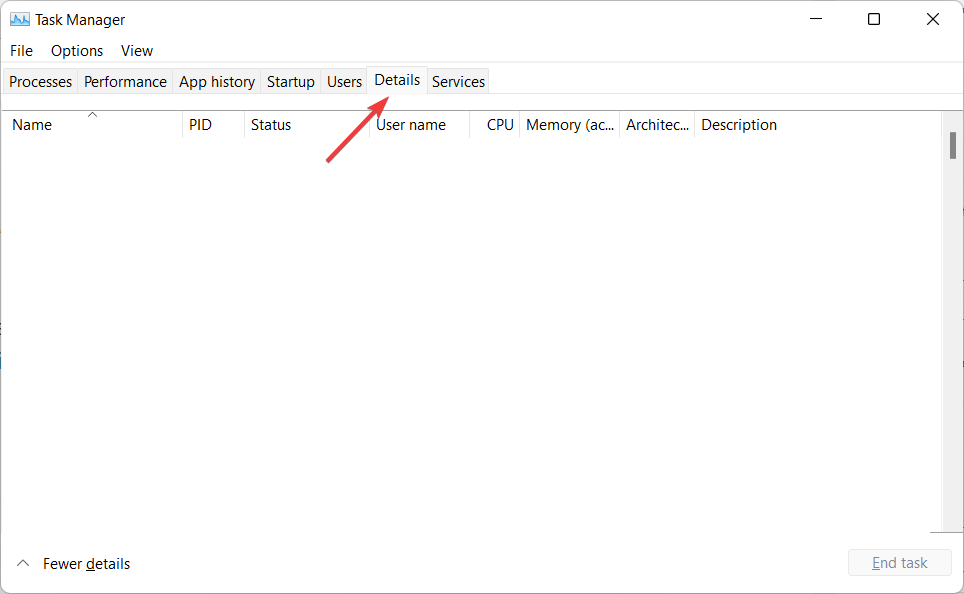
- Here, find the NVIDIA processes, click on them and choose End task.
- We showcased another process since we don't have any NVIDIA ones enabled at the moment.
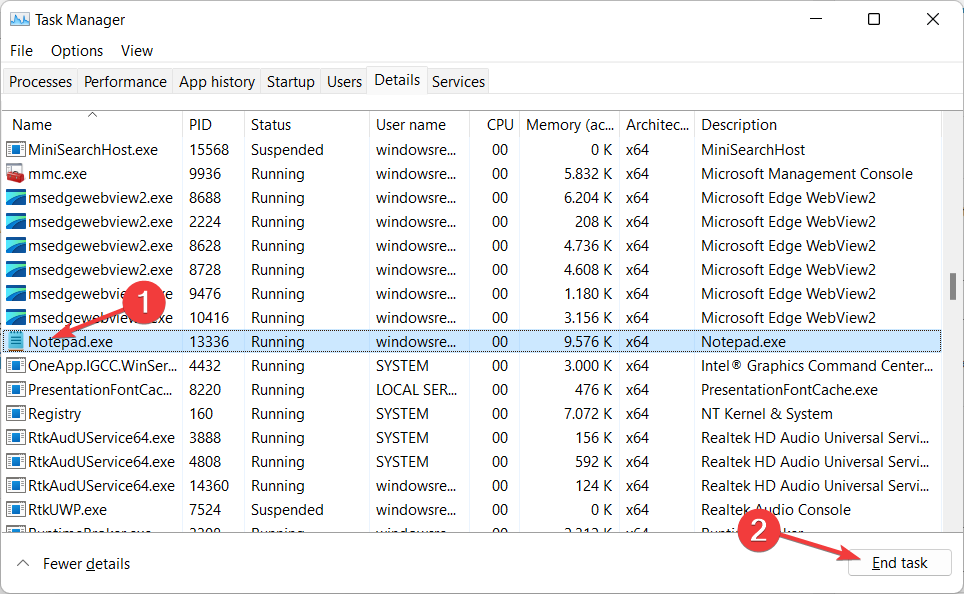
- Reopen the NVIDIA installer in order to see if the error is gone.
Note this solution works particularly for the NVIDIA installer cannot continue, other installations are running error messages.
Installing the most recent graphics card drivers has a variety of advantages, including improved gaming and clearer visuals, such as more upgraded photos, as well as improved video generation, particularly when using pure video technologies.
However, the primary advantage of a dedicated graphics card over a locally available GPU is that it speeds up the processor. For example, when using installed designs, more pressure is placed on the CPU.
But, because with a dedicated Graphics card, all graphical calculations are handled by the GPU, the processor is free to work on other tasks, resulting in overall better program execution.
For more information on how to fix NVIDIA issues, check out our guide on what to do if NVIDIA drivers keep crashing.
Alternatively, take a look at how to solve the NVIDIA drivers not installing on Windows 11 error, and get back to your favorite games.
Leave us a comment in the section below and tell us what you think. Thanks for reading!
Still having issues? Fix them with this tool:
SPONSORED
If the advices above haven't solved your issue, your PC may experience deeper Windows problems. We recommend downloading this PC Repair tool (rated Great on TrustPilot.com) to easily address them. After installation, simply click theStart Scan button and then press onRepair All.
![]()
Source: https://windowsreport.com/nvidia-installer-cannot-continue/#:~:text=The%20NVIDIA%20installer%20cannot%20continue,processes%20inside%20the%20Services%20app.
0 Response to "How to Get Nvidia Installer When Cannot Continue"
Post a Comment